How to Fix a Catalytic Converter without Replacing(An easy guide)

Today we will be discussing, How to Fix a Catalytic Converter without Replacing A comprehensive guide.

Fixing a damaged catalytic converter can be an expensive.

However, it is possible to repair a faulty catalytic converter without replacing it entirely, which can save you a significant amount of money in the long run.

In this article, we’ll provide you with some helpful tips and steps on how to fix a catalytic converter without replacing it.

With the right tools, knowledge, and a bit of elbow grease, you can get your car back on the road and reduce your environmental impact without breaking the bank.

Before this we will discuss the importance of Catalytic convertor, then will come straight to the solution.

What a catalytic converter is and why it is important

As much as you love the sound of a your engine roaring, you should also care about the environment. That’s why we need to talk about catalytic converters.

Now, I know what you’re thinking, “oh great, here comes the green brigade.” But bear with me, because this is important.

You see, a catalytic converter is a vital component in modern vehicles that helps to reduce the harmful pollutants emitted by the engine.

It’s like a superhero for the environment. When the exhaust gases pass through the converter, it uses a combination of heat and catalysts to convert harmful gases like carbon monoxide, nitrogen oxides, and hydrocarbons into less harmful substances such as carbon dioxide, nitrogen, and water vapor.

Why is this important, you may ask? Well, let me tell you. The emissions produced by vehicles can cause serious health problems for humans, such as respiratory problems, and contribute to environmental problems, such as smog and climate change.

By reducing these emissions, catalytic converters help to protect the environment and public health.

But that’s not all. A properly functioning catalytic converter can also improve the overall performance of a vehicle.

It helps to ensure that the engine is running efficiently, leading to better fuel economy and engine power. And let’s be honest, who doesn’t want more power under the hood?

Now, I know some of you may be thinking about removing your catalytic converter to get more power out of your engine.

But let me tell you, that’s a bad idea. First of all, it’s illegal in most countries, and you can face significant fines or legal penalties if caught.

Plus, removing your catalytic converter can lead to reduced fuel economy, decreased engine power, and even engine damage.

So, in conclusion, a catalytic converter may not be the most exciting part of your car, but it’s certainly one of the most important. It helps to protect the environment, public health, and even improves your car’s performance.

So, next time you hear that purring engine, just remember the important role your catalytic converter is playing behind the scenes.

Different Ways to Fix a Catalytic Converter without Replacing It

Now lets come straight to the point, what are the different ways on How to Fix a Catalytic Converter without Replacing it.

we’re going to talk about an often-overlooked part of your car’s exhaust system: the catalytic converter. Now, you may be asking yourself, “Why should I care about this boring old piece of metal?” Well, I’ll tell you why.

Over time, your catalytic converter can become clogged with carbon buildup, which can lead to reduced performance and fuel efficiency.

But fear not, my friends! With a few simple steps, you can clean your catalytic converter and restore your car’s power and efficiency. So, grab your toolbox and let’s get started!

Step-by-step instructions on how to clean the catalytic converter

  1. Park your vehicle on a level surface and allow the engine and exhaust system to cool down before beginning the cleaning process.
  2. Remove the catalytic converter from your vehicle by unbolting it from the exhaust system. It may be necessary to cut the exhaust pipe to remove the converter.
  3. Soak the catalytic converter in a cleaning solution specifically designed for this purpose. These solutions are available at most auto parts stores.
  4. Allow the catalytic converter to soak in the cleaning solution for the recommended time period, usually around 30 minutes to an hour.
  5. Rinse the catalytic converter thoroughly with water and allow it to dry completely.
  6. Reinstall the catalytic converter back onto your vehicle and bolt it securely into place.
  7. Start your engine and allow it to run for a few minutes to ensure that the catalytic converter is functioning properly.

It’s important to note that cleaning the catalytic converter this way is not always a guaranteed solution to fix all problems.

Car manufacturers does not recommend this way but these steps are usually tried by many DIY guyis.

If your catalytic converter is severely damaged or clogged, it may need to be replaced instead of cleaned.

Materials required to Clean the Catalytic convertor

  1. Gather the necessary materials: You will need a pressure washer or a garden hose, a cleaning agent (such as baking soda or commercial cleaner), a bucket, a funnel, and safety goggles.
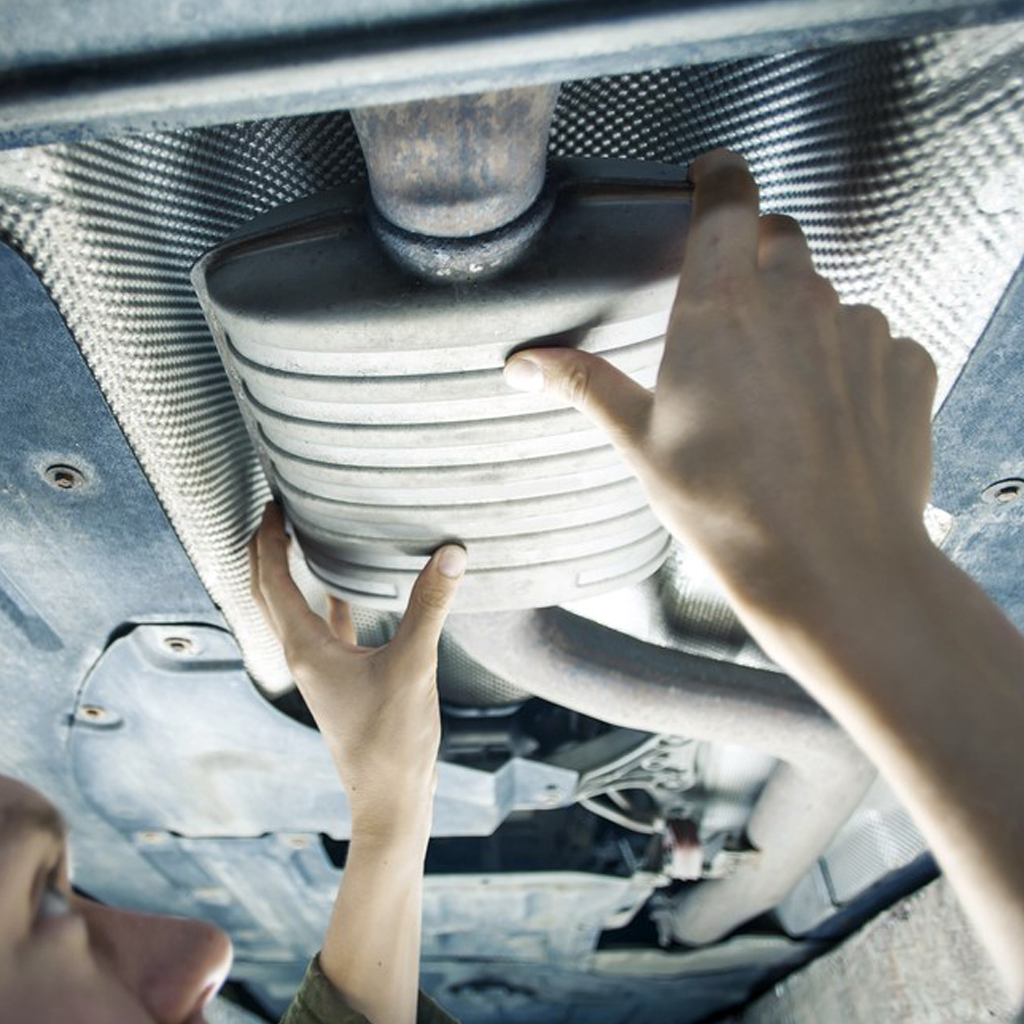
  2. Locate the catalytic converter: The catalytic converter is usually located between the engine and the muffler. It is a metal canister with pipes on either end.
  3. Remove the catalytic converter: The converter may be held in place by bolts or brackets. Remove any mounting hardware and detach the converter from the exhaust system.
  4. Soak the catalytic converter: Place the converter in a bucket filled with a cleaning agent or any other liquid soap or you can use WD40 before soaking too and let it soak for at least 30 minutes. This will help to dissolve any built-up carbon and debris.
  5. Rinse the catalytic converter: Use a pressure washer but from a little far to make the pressure less harsh or you can use a garden hose to rinse the converter thoroughly. Make sure to remove all of the cleaning agent and debris.
  6. Dry the catalytic converter: Allow the converter to air dry completely. Do not use any heat source to speed up the drying process, as this could damage the converter.
  7. Reinstall the catalytic converter: Once the converter is completely dry, reinstall it onto the exhaust system using the original mounting hardware.
  8. Test the catalytic converter: Start the engine and check for any leaks or abnormal sounds. If everything sounds and looks normal, you have successfully cleaned your catalytic converter.

Remember to always follow the manufacturer’s instructions and safety guidelines when using any cleaning solution or tool.

Precautions to take when cleaning the converter

Cleaning the catalytic converter is a delicate process that requires certain precautions to be taken to avoid damaging the converter.

Here are some precautions to keep in mind when cleaning the converter:

  1. Wear gloves and protective clothing: Catalytic converter cleaners can be corrosive and harmful to your skin. It is recommended that you wear gloves and protective clothing to avoid any contact with your skin.
  2. Work in a well-ventilated area: Catalytic converter cleaners can emit harmful fumes that can cause dizziness, headaches, and nausea. It is important to work in a well-ventilated area, preferably outdoors.
  3. Use the right cleaner: while using the cleaner check if how it is with its degreasing ability and can clean properly.
  4. Let the engine cool down: Before cleaning the converter, ensure that the engine has cooled down completely. This is to prevent any burns or injuries.

By following these precautions, you can effectively clean your catalytic converter without damaging it and ensure that it performs optimally.

Using Catalytic Converter Cleaner

How catalytic converter cleaner works

Now, you might be wondering how on earth this liquid can bring your catalytic converter back to life.

It’s like a miracle in a bottle! Well, let me explain it to you in simple terms.

The catalytic converter cleaner is specially formulated with a blend of powerful chemicals that break down the carbon and other contaminants that accumulate in your converter over time.

It’s like sending in a team of tiny cleaners to scrub away the grime and restore your converter to its former glory.

Think of it like a spa treatment for your car. So, if you want your engine to purr like a kitten and your emissions to stay squeaky clean, then a bottle of catalytic converter cleaner is just what the mechanic ordered.

Step-by-step instructions on how to use the cleaner

Today, I’m going to tell you how to use a catalytic converter cleaner that’s inserted into the fuel tank to clear out all the gunk and grime that’s built up in your exhaust system.

  • Step 1: Purchase a good quality catalytic converter cleaner that’s specifically designed for fuel tank use.
  • Step 2: Fill up your fuel tank with gas as you normally would.
  • Step 3: Pour the entire bottle of the cleaner into your fuel tank.
  • Step 4: Drive your car normally for at least 30 minutes, but preferably longer. The cleaner will be circulated through your entire exhaust system during this time, breaking down and clearing out any accumulated deposits.
  • Step 5: Once you’ve driven enough, get ready for some unpleasantness. The cleaner will have dissolved a lot of the dirt and grime, which will now be spewed out through your tailpipe. Expect a lot of black smoke and an unpleasant smell.
  • Step 6: After you’ve run the cleaner through the system, fill up your tank with fresh gas and drive for a bit longer to allow the system to be completely cleared out.

And there you have it. With just a bottle of catalytic converter cleaner, you can have your exhaust system running like almost new in no time. It’s easy, affordable, and can save you from costly repairs in the long run.

Precautions to take when using the cleaner

As with any car maintenance product, there are a few precautions you should take when using a catalytic converter cleaner. Here are some important tips to keep in mind:

  • Read the instructions carefully: Different catalytic converter cleaners may have slightly different instructions, so be sure to read and follow them carefully.
  • Use the right amount: Using too much or too little cleaner can affect its effectiveness. Follow the instructions on the label to determine how much cleaner to use.
  • Drive for a while after adding the cleaner: Driving for a few miles after adding the cleaner will help to distribute it evenly throughout the system.
  • Use only as directed: Using more cleaner than recommended or using it too often can damage the catalytic converter and other parts of the exhaust system.

By following these precautions, you can effectively use a catalytic converter cleaner without risking damage to your car’s exhaust system.

Tools Required to Fix a Catalytic Converter

Method 1: Cleaning the Catalytic Converter

  • Catalytic converter cleaner
  • Funnel
  • Safety goggles
  • Gloves
  • Safety mask

Method 2: Using an Additive

  • Catalytic converter additive
  • Funnel
  • Safety goggles
  • Gloves
  • Safety mask

How to Identify a Faulty Catalytic Converter

Signs and symptoms of a faulty catalytic converter

A faulty catalytic converter can cause a range of issues with your vehicle.

Here are some of the most common signs and symptoms that may indicate a problem with your catalytic converter:

  • Decreased engine performance: If your vehicle is not accelerating as quickly as it used to or is struggling to maintain speed, it could be due to a faulty catalytic converter.
  • Reduced fuel efficiency: A faulty catalytic converter can also cause your vehicle to consume more fuel than usual. This is because the converter is not able to properly filter out pollutants and emissions, which can cause your engine to work harder and use more fuel.
  • Rattling noise: A damaged catalytic converter may also cause a rattling noise to come from under your vehicle. This is because the internal components of the converter may have become loose or damaged.
  • Check engine light: If the check engine light on your dashboard comes on, it could be due to a faulty catalytic converter. This is because the converter is an integral part of your vehicle’s emissions control system, and any issues with it can trigger the warning light.

If you notice any of these signs or symptoms, then there is a chance that there is a problem with your Catalytic Convertor.

How to conduct a diagnostic test to identify the problem

let’s get our hands dirty and figure out what’s wrong with your car. Conducting a diagnostic test may sound daunting, but with the right tools and know-how, it can be done in no time. Here’s how:

  • Get an OBD-II scanner: This is a diagnostic tool that can read the codes generated by your car’s onboard computer system. You can purchase one at any auto parts store or online.
  • Locate the diagnostic port: This port is usually found under the dashboard on the driver’s side of the car. It’s a small rectangular shape that can be easily identified.
  • Connect the OBD-II scanner to the diagnostic port: Once connected, turn on the ignition and wait for the scanner to communicate with the car’s computer system. This process may take a few seconds.
  • Read the codes: The scanner will display a code or codes indicating what may be wrong with the car. Make note of the codes and refer to the scanner’s manual or online resources to interpret them.

Common problems associated with catalytic converters

Well folks, let’s talk about one of the most common issues plaguing our vehicles today: faulty catalytic converters.

These babies have been giving car owners headaches for years, and trust me, I’ve seen my fair share of them in garages.

The most common problem with catalytic converters is that they get clogged up over time.

This is caused by a buildup of pollutants and debris that accumulate inside the converter.

When this happens, your engine can’t breathe properly, and you’ll start to notice a host of issues like decreased fuel efficiency, reduced power, and even stalling.

So, if you’re experiencing any of these symptoms, it’s time to get your catalytic converter checked out.

Importance of fixing a faulty catalytic converter

Let me tell you something important. You see, a faulty catalytic converter is no joke.

It not only reduces your car’s performance and fuel efficiency, but it also poses a serious threat to the environment.

The toxic gases emitted from a malfunctioning converter can harm our planet and the creatures living on it.

It’s our responsibility to fix this problem and do our part in preserving the environment for future generations.

Plus, let’s not forget that replacing a catalytic converter can be quite expensive.

So, it’s better to fix it sooner rather than later. Trust me, it’s worth the investment for your car and our planet.

When to Replace a Catalytic Converter

A catalytic converter is an essential component of a vehicle’s emission system that reduces the harmful pollutants in the exhaust gases produced by an engine.

Despite being a durable component, catalytic converters can wear out over time, leading to decreased efficiency and poor performance.

If a converter becomes clogged, it can cause a significant reduction in engine power and fuel economy.

Some signs that may indicate a failing catalytic converter include rough idling, reduced acceleration, and increased emissions.

In severe cases, the Check Engine light may illuminate. In such instances, it is necessary to replace the catalytic converter to ensure proper engine operation and prevent further damage to the vehicle’s emission system.

If you have tried all the solutions mentioned above and still its not working fine then it is best to replace the Catalytic convertor.

Signs that indicate replacement is the only option

There are several signs that indicate replacement is the only option for a catalytic converter. One of the most obvious signs is a decrease in engine performance and efficiency.

If the catalytic converter is severely clogged or damaged, it can significantly impede the flow of exhaust gases, leading to reduced power and fuel economy.

Another sign is the appearance of warning lights on the dashboard, such as the check engine light.

This can indicate a malfunction in the catalytic converter or the vehicle’s emissions system as a whole.

Additionally, a damaged or failed catalytic converter can cause emissions to exceed legal limits, which can result in a failed emissions test and even fines in some areas.

Finally, physical damage to the converter, such as cracks or dents, can compromise its effectiveness and make replacement necessary.

It is important to address these signs promptly to avoid further damage to the vehicle and ensure compliance with emissions regulations.

Tips on selecting a new catalytic converter

So, you’re in the market for a new catalytic converter. It’s a crucial part of your car’s exhaust system that helps reduce harmful emissions.

But with so many options available, how do you know which one to choose? Well, fear not, because I’m here to give you some tips on selecting the best catalytic converter for your car.

First and foremost, you need to make sure that the catalytic converter you choose is compatible with your car’s make and model.

Not all catalytic converters are created equal, and you don’t want to end up with one that doesn’t fit or work properly.

Next, you want to consider the type of catalytic converter you need. There are two main types: two-way and three-way converters.

Two way converters are less expensive but only reduce carbon monoxide and hydrocarbons, while three way converters also reduce nitrogen oxide emissions.

You should also look at the material the catalytic converter is made of. Ceramic and metal substrates are the most common materials used.

Ceramic materials are more durable and offer better performance, but they’re also more expensive. Metal Material are less expensive but may not last as long.

Finally, consider the brand and reputation of the manufacturer. Stick with a good brand that have a good track record for producing high quality catalytic converters.

You may have to pay a little more, but it’s worth it for the peace of mind knowing you have a reliable and effective converter.

Pros and Cons of Fixing a Catalytic Converter Without Replacing

Pros and Cons Example

Pros

  • Cost-effective solution
  • Potential temporary fix
  • Retains original converter
  • Can improve emissions temporarily
  • Avoids the expense of a new converter
  • Can extend the life of the existing converter

Cons

  • Limited effectiveness in severe damage cases
  • Potential risk of future issues
  • Inability to fully restore optimal performance
  • Possible violation of local regulations
  • May not address underlying problems
  • Limited warranty or guarantee of results

How to tell if odometer has been rolled back? 9 Best tips

Are you going to buy a used car? or have bought one already? The most common fraud in the used car market is Odometer tampering and we will discuss How to tell if odometer has been rolled back.

Due to Lower economic growth, we have seen many people moving toward used cars. These scams are usually done by the car dealers to scam you into believing that this car is very much less driven and to charge you extra money on that.

The newer car they have more and more digital odometers which in result make it easier for the scammers to temper the Odometer.

We will discuss one by one how the car Odometers are tempered as we know the value of your hard-earned money and we don’t want you to fall into such scams and can check yourself if the Odometer has been rolled back or not.

Below is an Infographic on How to tell if odometer has been rolled back if you don’t want to read the whole blog post.

Infographic

How to tell if odometer has been rolled back

#1 Car maintenance history

The best tip to know If you or someone you know wants to know that How to tell if odometer has been rolled back , you can check this scam by seeing the previous maintenance records you can see how many intervals the cars have been maintained but with that, another thing mentioned on those records is the mileage.

See the previous maintenance record and match them with the mileage on the car odometer.

#2 Pedals

Another thing you can take notice of are the pedals on your car. If the car Odometer shows low mileage but the pedals show more wear & tear.

If the pedals show more overuse on them and you see the lines on pedals more fader than usual so the chances are that the car actually has more mileage on that.chances are that odometer has been rolled back.

if you see that the vehicle has some really fresh set of pedals do check if they were ever replaced or not.

#3 Gear Knob

Another way that is most suitable way for manual cars is to check if the odometer has been rolled back is to see the Gearknob.

If the gearknob seems to have more wear on it and the Odometer shows less mileage chances are that the odometer has been rolled back.

#4 Steering Wheel

Another way to check was my odometer rolled back or not is to check the steering wheel, if the steering wheel texture has faded chances are that the vehicle has more miles on it as the car that has been driven more would have fading here and there on the car.

#5 Visit a trusted mechanic

If you think that you cannot do it yourself and you don’t know how to tell if odometer has been rolled back and you are not able to judge if the Odometer is rolled back or not. You can take are trusted mechanic with you.

The mechanic by seeing the inner and outer condition of the vehicle as well as the engine will be able to tell if the claimed mileage is actually true or not.

#6 Check Overall vehicle condition

If you are checking if someone rolled back the odometer or not? the other way is to check the overall vehicle condition. If you see the vehicle Odometer is showing Low Mileage but the way car is from inside out does not depicts the claimed mileage chances are either the car has been driven carelessly or the meter is rolled back.

#7 Check Dashboard

Another way to check is to see the dashboard if you see the dashboard and it has a lot of fading marks on it chances are that the car has high mileage on it.

Another way to check is the gaps in the dash if you have some marks on the opening of the dashboard chances are that the dashboard was removed or opened at some point and on a low mileage car there is no need for low mileage.

If you see that the dashboard has an unnecessary shine on it and if you sit in the car and you smell something like a dashboard cleaner then it means that the car was recently detailed or a dashboard shiner was used then you should be extra cautious.

#8 Check Tires

If you are buying a family car and not a performance vehicle with low mileage if it’s under 50,000 miles but you see that the tires have worn a lot and most probably you would have to change if you buy make sure to check and inspect the rest of the car as most of the tires last 50,000 miles on average.

So if the car mileage doesn’t co relate with the reading on the odometer chances are that there is some sort of tempering with odometer.

#9 Check Speedometer

Another Goodway to check the car is to see the speedometer if you are going to buy a car with an analog meter. Do check if the opening of the speedometer area on the dashboard has scuff marks on it if not then next thing is to check if there is any dust visible inside the speedometer most of the mechanics will not do the cleaning of the speedometer cover and you can see traces of dust in it which will make it easier for you to catch if the speedometer has been rolled back or not.

The difficulty increases with the cars having digital speedometer because the tempering is done usually via the circuit board so there are no chance of any dust in the speedometer but another way to check if you get inspected by a third party and if you are lucky enough to open the dash part of speedometer there is seal if the seal is broken on the speedometer then chances are that the speedometer is tempered.

Can digital meters be tempered?

If you think that if you are seeing car with digital meters and there can’t be any chances of tempering then maybe you’re thinking the wrong way.

The analog odometers were actually more difficult to rolled back as compared to digital meters as it required to open the meter and then temper it by hand.

The digital meters on the other hand are faar more easier with the correct equipment to tamper.

There are certain gadgets used by car dealers that they use it to rolls back your meter to make the car seeming more attractive to customers like us.

Why a Rolled back odometer car is not good?

If you are thinking if the car is looking good and drives perfectly fine on the test drive so what the issue if it looks like the odometer is rolled back.

Well you are somewhat right but the thing is that if you buy this car and drive it.

Chances are due to odometer being rolled back if you drive this car you will face multiple maintainence issues, because if you maintain your car according to the current mileage chances are that you may miss the maintenance schedule, because cars are maintained according to miles or kilometers the part has driven.

So this purchase maybe a pain for you in the longer run, may cause trouble while travelling or maybe even leave you stranded on the road.

If you suggest you then that’s not a good idea to buy car with a rolled back odometer.

To see how big of a Fraud it here is a video explaining it:

Conclusion

If we conclude all the discussion when buying a car that has low mileage on it make sure to keep all these signs in mind if you want to keep yourself safe from getting scammed. This will make you understand if odometer has been rolled back or not.

FAQ

Can digital odometer be rolled back?

Yes digital Odometers can be rolled back but for some of the cars it is much more difficult to roll them back when compared to analog meter.

What to do if Odometer is rolled back

If someone has sold you a car with rolled back odometer simply visit that dealer let them know that they have scammed you and then proceed legally with it as Rolling back the odometer is a federal Offence and you can sue them for $10,000 plus the legal fees.

what does odometer roll back mean

In simple words, it mean someone has tried to temper the mileage of your vehicle to sell you a fake low mileage car to get some extra bucks out of your pocket.

Can a bmw odometer be rolled back

Unfortunately Yes BMW Odometers are able to be rolled back, the scams has increased day by day, even the digital meters are not prone to this fraud.

Why would an odometer be rolled back

Greed for extra money is why Odometers are rolled back, they want to buy a normal mileage car at a low price and then roll it back and sell it for much more the price of the car because of being the low mileage.

How to remove acid rain from car paint? 3 good steps

How to Remove acid rain from car

Have you seen the spots forming on your car after rain? staying there after the some days even if you wash it? Chances are that may be due to acidic rain. Today we will let you know how to remove acid rain from car paint.

Why acid rain is caused?

Acidic rain form when fossil fuel burns which contains Sulfur dioxide and nitrogen oxides which mixes in the environment and becomes nitric and sulfuric acid. So now you the science behind it we will now focus on how to remove acid rain from car paint.


There are 2 types of solutions and we will discuss both solutions here, first is the DIY solution and then the commercial options available on the market.

DIY option for acidic rain removal

Vinegar

Vinegar is the most found option to be used to remove acid rain from car paint, but it is not the most scientific one, You can give it a try if it works for you then you may not have to opt for the expensive options.

Vinegar is said to have properties to remove impurities from your car and can even remove the wax you applied on your car.

  • Take 1 cup of white vinegar and add it to quarter of water.
  • Spray it on your car where the acidic spots are.
  • Wipe it with a clean cloth and you may see acidic spots being removed.
  • Try to do this if it happened within a day or two other wise spots may go deep down into paint.

Now when you have tried this option and still it doesn’t work for you, now you may move to the commercial options.

Commercial options for acidic rain removal

Clay bar

There are special automotive clays that car detailer use to prep your car before detailing it can not only remove those spots but also remove the dirt stuck deep in your paint which may not even be seen by the naked eye.

This can also be helpful to remove the acidic rain spots as well make the paint surface smoother.

You can buy one of those clays from the market or order it online and see how to use it, or you can take your car to a good detailer and they do the required procedure but I guess we should try it ourselves first.

  • You can use the clay bar with a bottle of distilled water and spray it before using the clay
  • Applying it in circular manner or up and down movement and you are good to go with this procedure.
  • When you feel the surface is dry spray the water on it and repeat
  • After sometime you will see these rain spots disappear from the paint
  • To double check it wipe the surface with a clean cloth and check again
  • Once you have done all the above and the rain spots are removed try to seal the surface with good wax which will protect the paint for future too.

We hope that this works for you but if it doesn’t or after reading you don’t feel satisfied you can move to the next option.

Rubbing or Polishing

The second option is to use Dual action polishing machine with a rubbing compound, we hope that the spots are not deep down in your paint and less polishing is required to remove these marks. If the marks on the first layer of paint it will be easier not much but relatively easier to remove these marks.

If you have a good Dual action polishing machine you know how to operate it you are good to go or you can rub it by hand with a polishing compound.

Polishing from the polisher machine or by hand is an Art doing it in a wrong way would damage your car paint more. you should really learn first how to remove acid rain from car paint with the help of a polisher machine.

If you are not aware of it you are one YouTube video away to learn it and if you don’t feel confident enough than you should surely seek a professionals help.

Reaching out to a professional detailer would be an expensive option but will be worth it.

When going by hand you can use a good polishing compound and good microfiber cloth.

Use the cloth in circular manner as the polisher rotates and imitate that. Don’t over do and under do keep a balance as when we are doing it by the polisher or hand it generates heat which in result can damage paint layers.

We hope that this solution helps you really well.

Watermarks remover

This image shows the watermarks remvoer on the market

The next solution we can use to remove acid rain from car paint is to use acid removers for cars.

There are certain products on the market which you can use to remove acidic rain spots, well technically they are made to remove rain spots but will likely work for acidic rain too.

These are basically rubbing compound made to remove watermarks from the car. When using these try to wear a pair of gloves and then work on your car.

Before using this make sure:

  • The surface area is clean
  • Wipe it off with a clean cloth
  • You can also give it a quick wash on the area, try to use a PH balanced car wash soap.
  • Avoid getting the rain spot remover on plastic or chromed parts better use chrome polish, read the product details first.

Below are two of the branded rain spot removers on the market you can get it and get your job done.

Meguiar’s A3714 Water Spot Remover

This is a Rain water spot remover from Meguiar’s which is a widely recognized brand for car care accessories.

This will not only remove the car spots from the car but will also enhance the shine of the car.

It is perfectly safe to use on hard plastic, chrome parts or glass surface too. It can be used to be applied by hand or double action polisher.

Apply this on a cool surface area and apply this in a shade

This water spot remover will remove your rain spots without damaging the paint of your car.

Chemical Guys SPI10816 Heavy Duty Water Spot Remover

This is another Rain water spot remover from Chemical guys is of 16 fl oz , which is another good brand of car care items.

It will easily remove water stains, mineral deposits from water, hard water spots, or mild acid spots.

This solution will perfectly work on Paint, glass, Matt Surface or metal. This solution is also helpful if you are prepping your car for detailing as it will remove all the stains from the car paint work and prep it for detailing.

What to when you have successfully removed acid rain from car paint?

Now when you have successfully done it, the next step is to wax and seal the surface you have cleared so it will make your paint safer for the next 2 to 3 rains.

Once it rains the next time try to rinse of our car with Tap water and dry it with a clean dry cloth so that stains wont appear again.

I hope this article really helped you to know how to remove acid rain from car paint.

What would cause a car to shut off while driving?

If your car has suddenly stopped You might have thought What would cause a car to shut off while driving? because nothing makes your heart race like your automobile abruptly shutting off in the middle of traffic. It is your responsibility to maintain an automobile when you own one.

Many auto owners seem to believe that their vehicle is powered by magic dust. To ensure that your automobile stays in good working order for a long time, you must check the oil, gas, coolant, and other fluids on a regular basis.

Knowing the basics about your automobile might help you deal with technical issues like your car switching off while you’re driving.

In this post, we’ll explain why your car could shut off while driving, so you’ll be prepared the next time it happens.

This is an infographic explaining what would cause a car to shut off while driving?

#1 Problems with ignition Switch

The ignition switch may be at blame if your automobile abruptly shuts off while traveling. When the ignition switch becomes frayed, vibrations, such as striking a circular section of roadway, cause your engine to lose power.

Your car’s engine dies unexpectedly while traveling on the road due to a loss of power. The ignition switch is located behind the ignition lock and is activated when the key is turned to start the vehicle.

Small metal plates on the inside of this switch can corrode and rust. If this happens, one of these plates may break contact, resulting in the ignition being turned off & would cause a car to shut off while driving

This will also result in the entire engine shutting down. Fortunately, determining whether or not this is the case is simple.

Check your dashboard for any remaining lights/ignition lights after the car has shut off. If the dashboard instrument isn’t working, there’s a good probability the ignition switch is broken.

#2 Alternator Problems

Your vehicle’s alternator controls the flow of electricity. If your automobile suddenly stops operating, it’s possible that the alternator has failed.

The power supply to essential automotive components will be cut off if the alternator fails, and you may notice the lights in the dash shutting out or the engine unexpectedly losing power.

When the auto alternator malfunctions, it loses its capacity to charge the electrical system, resulting in a power drain. The power may steadily dwindle until you can only keep the car running at idle.

As a result, you may need to charge it before it dies again. Normally, this will result in an unplanned shutdown, leaving you in a difficult driving circumstance.

To guarantee efficient operation and avoid unexpected automobile shutoffs, drivers must keep the battery and alternator connections clean at all times.

Symptoms such as the dashboard warning light turning on, flickering headlights, battery draining faster, and harsher engine running can all indicate a malfunctioning alternator.

You can simply repair or replace the alternator on your own if you know what you’re doing, or have it done for you during normal maintenance because it’s quick and cheap.

#3 Dead Battery

The battery is another important component for vehicle power since it provides the necessary electricity to initiate the combustion process as well as powering other electrical components.

When you have a dead battery, one of the problems you’ll probably have is the car switching off while driving since the battery won’t be able to charge properly, meaning it might run out of power at any point.

However, in many circumstances, if the battery can start the car, it should be able to keep it going as well.

As a result, if anything like a short-circuit occurs while driving, it will usually simply force the car to halt.

#3 Faulty Fuel Pump

The vehicle’s engine requires a constant supply of gasoline in order to propel the vehicle. As a result, if the gasoline supply is disrupted, the automobile will shut down while traveling.

One of the most common problems that might impact the engine’s fuel delivery is a broken fuel pump. As a result, if your fuel pump fails, you’re more prone to encounter engine shutoffs.

Occasionally, the fuel filter, not the fuel pump, is the source of the problem.

However, regardless of the cause of the issue, it must be resolved in order for your car to continue to perform properly.

#4 Malfunctioning Sensors

Many sensors are used in modern automobiles to adjust the air-fuel combination for maximum fuel efficiency. If one of your car’s sensors fails or is turned off, the engine may shut down altogether.

Fortunately, most of these sensors can’t entirely turn off the engine.

Sensors such as the MAF sensor, coolant temperature sensor, and oxygen sensor might muck up the air-fuel mixture to the point that the engine dies.

#5 Electrical Cable Failure

If your battery is in good operating order and other components such as spark plugs and alternators are in good functioning order, another possible cause for your automobile to cut off while driving is a loose or defective electrical line.

The vehicle must not only generate adequate electricity but also deliver it to all of the critical components, which is what the cables are responsible for.

If the cables become loose or damaged while driving, the vehicle’s key parts and components may lose power, resulting in an unexpected engine cut off while driving.

#6 Defective Engine Control Unit

The engine control unit, or simply ECU, is one of the most important components in modern automobiles because it is responsible for the majority of the vehicle’s activities.

The ECU is a little computer that ensures that everything in your car operates well and that any faults are easily identified.

If this automobile computer isn’t operating properly, it might cause the engine to lose power, causing the vehicle to shut down.

When you have an issue with the ECU or other engine or vehicle problems that cause the computer to malfunction, the check engine light will likely turn on.

#7 Empty Fuel Tank

Most automobile owners are aware that they should check their fuel level periodically while driving.

If you have enough gasoline for your trip, that’s great; however, if your fuel gauge or fuel level sender has failed and no longer displays the true level of gasoline in your vehicle, you might be in serious trouble.

Filling 1 gallon (4 liters) of gas and seeing if it starts is a simple technique to test whether there is an issue with your fuel gauge or fuel level sensor.

As a result, checking the gasoline gauge might prevent you from spending hours and hours on the road.

If this happens again, you may need to take your car to a mechanic to have your fuel gauge checked since it may be giving you a misleading reading.

Useful Tips for reducing the likelihood of your car stopping

• Maintain a regular maintenance plan and make sure your car is maintained completely at all times.
• Keep the battery terminals and alternator connections clean and clear of debris at all times.
• When the gasoline warning light turns on, refuel right away.
• Replace your spark plugs on a regular basis.

In a Nutshell :

Cars do not just switch off while driving because there is always an underlying problem, whether it is a malfunctioning fuel pump or alternator, or you have just ran out of gas without realizing it.

Identifying the source is always the first step in dealing with this unpleasant and perhaps deadly condition.

If you’re a seasoned driver, warning indicators of a problem should be obvious, as they’ll appear long before the automobile abruptly shuts down.

Fixing the underlying issue is the best method to deal with the problem after you’ve identified the source, and in many cases, you won’t even need the help of a technician.

Finally, the best method to deal with this issue is to avoid it by doing regular car maintenance and maintaining safe driving behaviors.

How to Make a Car Audio Sound Better?

Have you ever wondered if you could Make a car audio sound better? In Low-end cars, this is a common issue. Many people would simply accept their car audio’s default settings.

If you don’t know there’s a better one, you’ll just choose whatever is in front of you. The primary motivation for people to make a car audio sound better is to increase the sound quality of their vehicle.

There are a few different ways to do this; use one and your car’s audio quality will change slightly. If you try them all, your car will become a mobile Music room.

The majority of methods for enhancing sound quality in your car include modifications, such as purchasing a new head unit or adding luxury speakers or a subwoofer.

Some are more concerned with improving the sound in your car by eliminating as much external disturbance as possible.

Identify the Deficiencies

Before a Car audio expert will upgrade the tone of your car stereo, you must first consider what needs to be changed.

In the case of a machine that doesn’t play high enough or has enough sound, defining the improvement could be easy. If you don’t like the average tonal balance, it would be helpful if you could indicate how you want it to sound.

If the positioning and imaging aren’t to your liking, the way we approach the update changes radically.

Choose a song or two that you understand well and connect to them on as many audio channels as necessary to identify what you want to change.

Reference listening may be done with a friend’s car stereo, your home stereo, or a pair of headphones.

Make a list of what you like about each and what you think should be changed, and then take it to the nearest Car audio store.


Here are some ways on how to make a car audio sound better:

Upgrade Your Speakers

While thinking how to make a car audio sound better, the first phase is self-evident.

The efficiency of factory-installed speakers in your car pales in comparison to third-party speaker integration.

Simply replacing your car speakers with a higher-quality package would increase the sound and clarity of your audio. Particularly if you buy a dedicated subwoofer to amplify up the bass.

Upgrade Your Receiver

Since you’ve installed good speakers in your vehicle, you’ll want to boost the signal they get.

Your car’s factory-mounted receiver, like its stock speakers, can cut corners when it happens to audio quality.

For starters, the output power would be insufficient to make the most of your improved speakers. Then there’s the digital to analog converter’s (DAC) and its quality.

This is what transforms the digital signals from your CD or computer to music. The higher the DAC, the more information in your audio can come out.

This is very important to make a car audio sound better

Adjustments should be made carefully

Turning on the bass is the way to go if you want more bass, right? No, not at all.

It won’t be very powerful unless you have high-quality devices, and you’ll end up with interference and over-stressing your speakers.

Conversely, work backward: keep the bass alone, reduce the mid-bass and treble, and then increase the total length while considering how to make a car audio sound better.

Use an amplifier

A strong amp brings a new level of clarity to the sound by delivering more accurate messages to the microphones, so it’s not just about how noisy you can get your setup.

The effect is clarity that allows you to distinguish individual components in the music you’re listening to.

Upgrade Your Head Unit

If you have a head unit installed Audio output suffers when listening to music.

Although updating your head unit isn’t necessarily the easiest place to begin when it comes to improving audio quality, it’s always worth thinking about.

This is particularly true if your head unit is starting to show its age, or if it lacks preamp outputs and you’re planning to add an amplifier.

If you want to listen to streaming music in your car, updating your head unit is also a good idea.

If your head unit doesn’t include an elevated built-in DAC, replacing it with one would enable you to unload the digital sound transfer from your smartphone or music player to your car stereo.

A USB or patented link is needed to use a head unit with an elevated DAC, so consider that you’ll have to link your mobile or other gadgets to your car speakers through a USB connection instead of an aux input.

This enables the head unit to read data from the interface and translate it into analog audio signals for transmission to the amplifier and speakers.

Sound-deadening in interior

The majority of methods for how to make a car audio sound better include updating your car sound system, but they ignore the possibility that cars have unpredictable soundstages.

The characteristics of a car or truck’s interior volume can never equal that of your home theatre, but damping materials will help.

In this group, the simplest and quickest cure is to insert some damping materials, such as Dynamat, into your door panels.

These devices are sound-deadening layers that help block out road traffic and other potential causes of crosstalk, which is why they’re so simple to mount in your door frames.

Pulling each panel off, slipping in a layer of damping substance, and then placing the sheets back on is all there is to it.

The same procedure may be used to eliminate noise from other sources.

For example, similar sound-deadening material can be mounted on the inside of your hood to help reduce road noise, and then the same substance can even be mounted underneath your carpet to reduce road noise.

Compatible dampers are also available to keep sounds from your car stereo from penetrating the surface of the doors and other places where they’re installed.

You can see an improvement in sound quality by reducing the use of vibrating metal and instead relying on vibrating air.