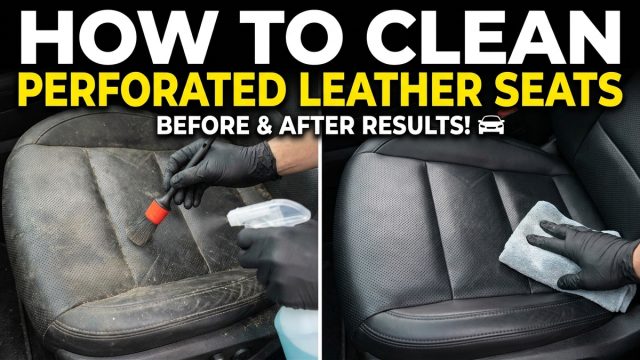
We’ve all eaten or had a drink in the car at some point or maybe your kid dropped a snack or spilled juice between the seats. Days later, the area feels sticky or starts to smell a little off. That’s often because of perforated leather seats.
They look classy and add comfort, especially in luxury vehicles. But those tiny holes, designed to help with airflow and cooling, can trap dirt, crumbs, and liquids if not cleaned properly.
In this blog, you’ll find a simple, step-by-step guide to safely clean and maintain your perforated leather car seats at home
Step-by-Step Cleaning Process
Vacuum the Seats to Remove Dirt and Dust
Start with a soft vacuum nozzle to clean off crumbs, dust, and dirt. Pay close attention to the perforated areas; those tiny holes can hide all sorts of dirt, and if you skip this step, you’ll end up rubbing that dirt deeper in when you start wiping.
Use Compressed Air to Clean Out Perforated Holes
After vacuuming, use compressed air to loosen any dust stuck inside the tiny holes that the vacuum couldn’t reach. Just be sure to hold the can a few inches away so you don’t damage the leather seats.
Apply Leather Cleaner Around the Holes
Apply a small amount of leather cleaner to a microfiber cloth. Never spray it directly onto perforated leather. Gently wipe the seat in small sections. For stubborn spots, use a soft brush to clean without pushing product into the holes. Be extra careful during this step to prevent any liquid from getting inside.
Dry the Surface Gently with a Clean Cloth
After cleaning, take a dry microfiber cloth and gently blot the surface to absorb any leftover moisture. Focus on the perforated areas, and avoid rubbing too hard, as that could push moisture deeper into the holes. Let the seats air dry naturally for a few minutes.
Condition the Leather to Keep It Soft and Protected
After the leather is fully dry, apply a small amount of leather conditioner to a microfiber cloth. Gently rub it into the leather using circular motions, but avoid the perforated holes. You want to moisturize the leather, not clog the holes with conditioner. After a few minutes, wipe off any excess with a clean, dry cloth. This step helps keep your seats fresh-looking and protected.
Final Check and Leather Care Tips
Now that your seats are clean and conditioned, take a few minutes to do a quick check for any missed spots, especially around the seams and perforated sections.
To keep your perforated leather seats looking great, follow these simple care tips:
Wipe regularly
Avoid eating or drinking in the car. If you do, clean up spills right away.
Avoid harsh cleaners
Protect from the sun
Condition every few months
Conclusion
Perforated leather seats might look fancy, but they need the right care and know-how to stay that way. By following these steps, you can keep your seats looking like new. A little regular maintenance goes a long way in protecting your car’s interior.
FAQ Section:
Q1: Can I use household cleaners on perforated leather seats?
It’s not recommended. Most household cleaners are too harsh and may dry out the leather. Always use a leather-specific cleaner
Q2: Can I clean perforated leather seats regularly using just conditioner?
For regular cleaning, always use a leather cleaner first, then apply conditioner as a follow-up step to keep the leather soft and prevent cracking.
Q3: Can I use a steam cleaner on perforated leather?
No, steam cleaners can force moisture into the holes and damage the leather.
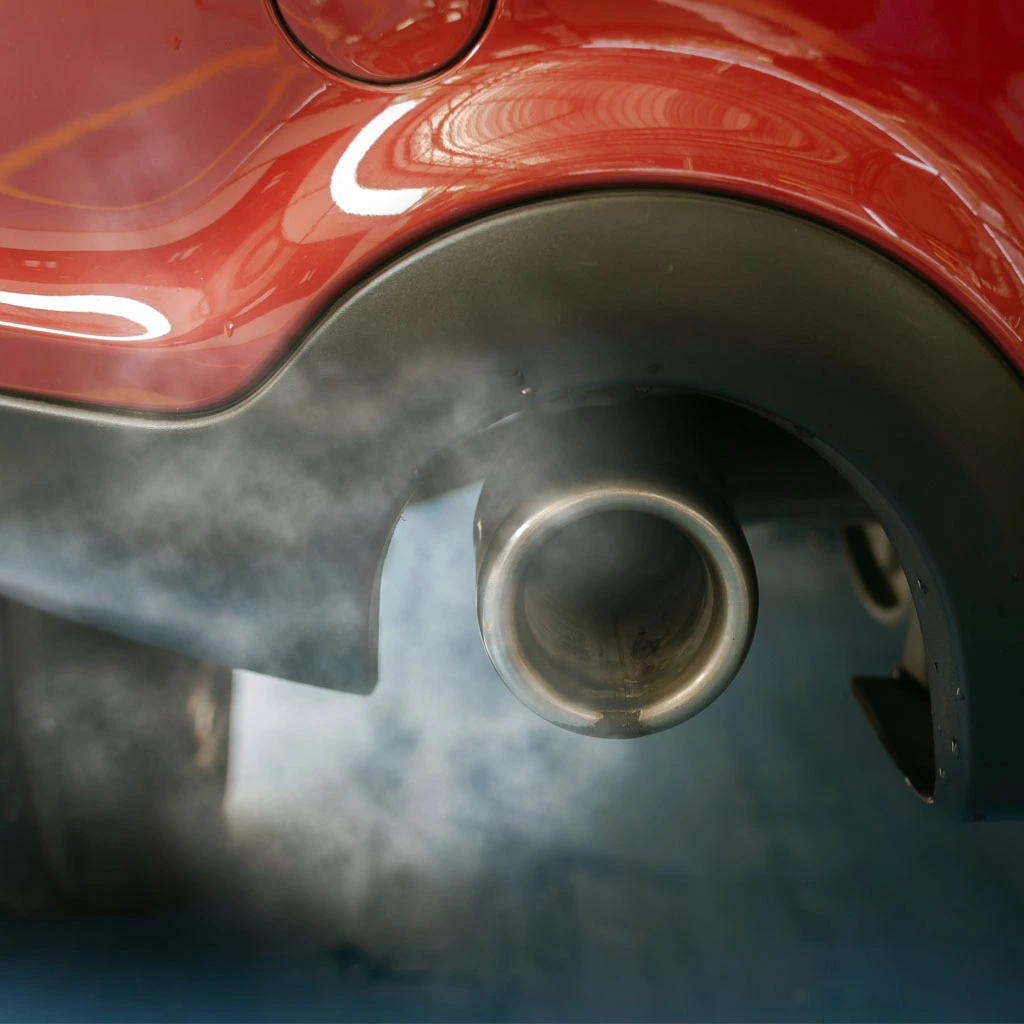
As car owners, we are all familiar with Blue exhaust smoke, and we have all seen oil additives that claim to eliminate it. We will be discussing the Best oil Additive to Stop Smoke.
Oil additives are chemicals that are mixed into the engine burning oil to improve lubrication. They alter the oil’s viscosity, ensuring that the engine works smoothly and can best oil additive for burning oil issues in your car.
Oil additives are applied to your engine oil to increase the engine’s lifetime and performance. This is accomplished by lowering the amount of oil wasted in the engine, which is the source of the smoke.
It’s not a pleasant sight to see cars spewing clouds of smoke behind them. Smoke from your exhaust may not indicate terminal damage or costly repairs, despite the fact that it is hardly the picture of a properly functioning car.
It’s just an indication that the vehicle isn’t performing at its best and needs some maintenance and attention to get back on track.
We’ve hand-selected the best oil additives to stop smoke for you, along with a review of each.
Due to their time-tested, high-quality range of vehicle boosting items, Wynn’s is a name we always seek to for best oil additive to stop smoke.
Their stop smoke solution does exactly that; it is meant to reduce blue smoke generated from your car’s exhaust as a result of oil burning.
This substance improves the viscosity and flexibility of your engine oil by mixing with it. The oil’s new characteristics allow it to effectively seal gaps between worn-out engine components that previously allowed oil to leak through.
Improving oil quality will minimize oil burn caused by high temperatures or high loads, providing additional protection for the oil when driving at high speeds or with heavy loads.
This can be the best oil additive for burning oil , With the exception of a tiny proportion of bigger engine automobiles, one can treat between 3 and 6 liters of engine oil, which is acceptable for virtually all vehicles in the UK.
It’s easily added when you get your oil changed. All gasoline, diesel, and LPG-powered cars are compatible. Even at extreme temperatures, the WYNNS solution ensures a thick protective oil film, allowing your engine to run longer.
If you have the funds, it may be utilized in a number of engine types, making it a smart choice. It may be used as a preventative step to aid your engine as well as a remedy to smoke-related concerns.
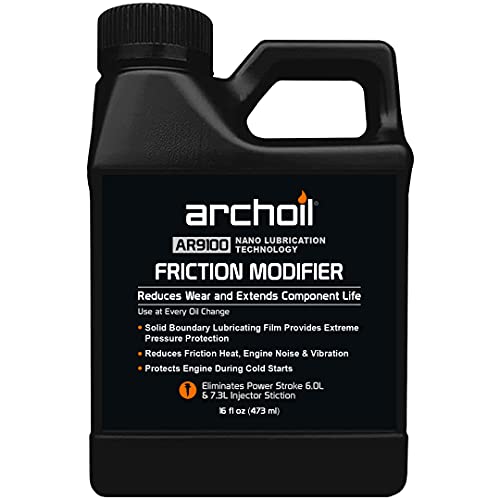
Archoil AR9100 is an oil additive that may be used in gasoline and diesel engines. What sets it apart is that it can resolve Powerstroke cold start issues, potentially saving you a lot of money in the long run.
It has the ability to minimize engine noise, friction, and vibration. Because the oil treatment is comprised of zinc, it can reduce the wear and strain on your engine parts. It also enhances the hydraulics, steering wheel, and gearbox’s oil usage and performance, can be the best oil additive for burning oil issues.
The bottle has a capacity of 16 fluid ounces, which will last you a long time before you need to replace it. The Archoil AR9100’s most serious flaw is that it doesn’t perform well in hot environments.
If you live in a chilly or cool climate, though, you may still use it comfortably.
Simply avoid storing it in a chilly garage throughout the winter months, or it may become coated. It increases your fuel efficiency, extends the time between oil changes, and eliminates needless stiction and cold starts during inclement weather.
In the process, the AR9100 produces a smoother and quieter engine, resulting in a better driving experience. When this oil additive to stop smoke is absorbed on metal friction surfaces, it produces a protective boundary line lubricating layer.
It also fills in any surface irregularities, resulting in a smooth, hard film. AR9100 can assist minimize friction between surfaces since it has a lower covering strength than other metal bonds.
As a result, more electricity is generated, money is saved through improved fuel efficiency, and heat is reduced.
You’ll also notice a significant reduction in engine noise and vibration, resulting in a much more pleasant ride.
Pros
engine is protected during cold starts
Sludge and varnish deposits are cleaned
Improves the engine oil and slows down its deterioration
Another well-known name in the industry that makes the best oil additive to stop smoke is Liqui Moly.
Their recipe is identical in principle to that of their competitors, preventing oil burn within the combustion chamber and ensuring that extra oil is used to the bare minimum.
It is specially designed to prevent oil from flowing through worn piston rings and valve guides in an engine.
It will keep the oil viscosity from changing during temperature extremes, which would normally thin the oil and enable it to flow into the combustion chamber and can be used as the best oil additive for burning oil issues in your car.
This will also provide additional protection for the engine’s internal components and the catalytic converter.
At your next oil change, just pour the contents of one container into 4-6 liters of motor oil. If there is excessive oil consumption, the product can be applied in between services.
Smoke Stop by Liqui Moly is compatible with both gasoline and diesel cars, as well as all commercially available lubricants.
The addition is based on a better viscosity index improver substance that continues to function overtime to maintain the oil viscosity high.
The product works through the valve guides and piston rings and is suited for gasoline and diesel engines. The product size is adequate for 4-6L engines, but bigger engines will almost certainly require additional pieces.
Pros
Prevents oil burn and excessive use of oil
At high temperatures protects the viscosity of the oil
Rislone Ring Seal Smoke Repair is made up of high-shear polymers that cover engine components including pistons and rings to improve sealing, increase compression, and reduce blow-by, and blue exhaust smoke and can be a best oil additive for burning oil issues in your car.
Rislone Ring Seal Smoke Repair is compatible with gasoline, diesel, and LPG engines, as well as supercharged and turbocharged engines. A single bottle can cure up to 4-6 liters of oil.
This product may be used in 4-stroke ATVs, motorcycles, and other small engine vehicles in addition to automobiles.
It is suggested that 100ml per liter of oil be used in these engines.
This oil additive works to reduce blow-by build-up in the crankcase, which is a typical problem caused by small internal engine gaps caused by wear.
It works with traditional, high-kilometer, and synthetic engine oils in both hot and cold conditions. It adheres to metal surfaces and forms a protective layer, allowing oil to flow freely in all-weather situations.
The product, which is also designed to cushion and coat engine components to decrease wear and quiet noisy lifters, maintains oil flow characteristics in both hot and cold conditions and may be added to engine oil at any time; it works with traditional, high-mileage, and synthetic engine oil.
This stop smoke solution, which is specifically intended for older automobiles burning oil, seeks to resolve and avoid oil burn within your car’s engine, which causes unwanted blue smoke from your exhaust and excessive oil usage.
By renewing old components like piston rings and valve seals, the active solution claims to eliminate undesired play in engine parts.
As a result, the engine runs more smoothly, resulting in improved performance and perhaps higher fuel economy.
Because of the high concentration of the product, the engine oil has more viscosity, which ensures greater adherence to moving components, extending engine life and reducing future reliability issues.
This additive’s active ingredient eliminates unnecessary play between worn engine components like piston rings and valve seals while also making oil seals more flexible and allowing them to seal optimally.
Because Stop Smoke Pro optimizes all of the engine’s components, the compression ratio of the engine rises.
As a consequence, the engine performs better, producing greater power while using less gasoline.
This oil additive to stop smoke is compatible with all current engine oils and may be used in cars fueled by gasoline, diesel, LPG, or CNG.
One can of this oil additive treats up to 5 liters of motor oil (ideal for most engines under 2.5 liters in size), and it’s easy to mix and apply at the next oil change you may find a the best oil additive for burning oil issues if there are any in your car.
Because of the additives package’s concentrated composition, the oil’s viscosity rises.
This enhances lubrication by ensuring that the oil sticks more efficiently to the moving components of the engine.
As a result, the engine’s service life is significantly extended.
Pros
Compression is improved
Can be used with a variety of oils
The catalytic converter is not harmed
Engine noise is reduced
Reduces exhaust smoke and improves viscosity, reduces oil burning
Cons
no mention of biodiesel vehicle compatibility
bigger engine cars, numerous cans are likely to be required.
Oil additives are rarely created with a single objective in mind, thus most products help your vehicle in a number of ways.
Reduced friction, reduced fuel consumption, and rust prevention are the three most frequent in the oil additive and also be the best oil additive for burning oil issues in your car.
Most oil additives have a lubricating effect, which decreases friction between the engine’s metal sheets and helps to extend engine life.
Because the engine is under less stress after an oil change or two, your fuel consumption per gallon should drop by around 1-2 miles per gallon.
To get the most bang for your budget, search for chemicals that prevent corrosion and rust as well.
Detergent properties can be found in several motor oil additives. This would be beneficial in unclogging contaminants trapped between engine parts and lowering the high friction.
Oil additives, on the other hand, can be used to control temperature. The oil additive works by decreasing engine oil loss, which creates a buildup of smoke in your exhaust pipe. It also cuts down on engine noise.
To prevent oil leaks, a high-quality engine oil additive should be able to seal tiny scratches and micro cracks.
This might save you a lot of money in the long run since you won’t have to replace the leaking oil as often.
Conclusion
You already know how vital it is to have your car’s oil changed on a regular basis.
Your car’s core components and systems might suffer significant issues if you don’t have them, and you could end up with expensive repairs you don’t want to pay for.
What you might not consider as often as your oil changes, though, is what your oil is doing under the hood.
Whether you rely on your oil to keep your engine and all of its components operating smoothly, you should check with it to look for the best oil additive to stop smoke.
Is oil pressure improved by oil additives?
Yes. Oil pressure can be improved with most additives, but only momentarily. If your car has low oil pressure, it might indicate that there are significant engine problems that need to be handled by a professional.
Can oil additives hurt my engine?
If you pick an oil additive that is intended to function with the type of oil your car requires, you shouldn’t have any problems with your engine. Some additions are general, while others are more specific, so double-check the suggested use cases before deciding which one to employ.
How often should I change my oil additive?
Your vehicle’s owner’s handbook will tell you. Oil additives must be combined with motor oil; therefore, do so every time you change the oil.
You’re late for work, coffee in hand, and your car won’t start again. And you’re left wondering: What Keeps Draining My Car Battery?
A drained battery can be puzzling, particularly when things appear a mess. You may have switched off the lights, or the battery might be brand new. What could be the issue?
In this guide, we’ll break down the most common things draining your car battery and show you how to fix them, even if you’re not a mechanic.
Common Causes of Battery Drain
1. Lights Left On:
Sometimes, a light inside your car is on, draining your battery. This can happen when you turn off the car, but the door isn’t closed properly, or a switch is left on. Some new cars have a feature that turns the lights off automatically, but if your car doesn’t, you have to switch them off yourself otherwise, they can drain your battery.
2. Old Battery:
Every part has its limit, After about three to four years, you may notice your car takes longer to start. Especially in cold weather, you may notice your engine starts more slowly, your lights look dimmer, or you need a jumpstart more often. It starts draining faster than it should, so it’s not a small issue. These are the signs your battery should be replaced before it leaves you stuck.
3. Big Temperature Swings:
If your battery is old, your car won’t handle very hot or very cold weather well. In summer, the heat can dry out the battery, and in winter, the cold can slow it down, making it harder to start your car. A new battery can handle these temperatures much better.
4. Quick Drives And Long Breaks:
The battery slowly drains when you only take quick drives, like running to the nearby grocery store. In those short trips, the alternator doesn’t get enough time to fully recharge the battery. Also, if your car sits parked for weeks without being driven, the battery keeps draining even if it’s pretty new.
5. Battery Not Plugged In Right:
The metal connectors on your battery can become loose or dirty over time, especially if you drive on bumpy roads. If they’re not tight or covered in white or greenish powder, your car might not start easily. It also makes it harder for the battery to send power to the car and can even affect your car’s electronics.
In-Depth & Overlooked Battery Drains:
1. Parasitic Battery Drain:
Sometimes, small systems continue running even when the car is off, like a tiny light in the glove box, security systems, USB port, power seats, dashcams, or the clock. To avoid this, double-check that your glove box is fully closed and no lights are left on when you leave your car. Otherwise, you might come back to a dead battery. If you think you’re dealing with a parasitic drain, you can check it yourself by disconnecting the battery, using a multimeter, and looking for a current draw over 50 milliamps. If you find one, start pulling fuses one at a time to figure out which system is causing the issue.
2. Battery Not Getting Charged While Driving:
When you start your car, the battery does the work. The alternator keeps it charged while you drive. If the alternator isn’t working properly, the battery won’t get the power it needs. So even if you were just driving, your car might not start the next time you try. This kind of charging problem can drain your car battery.
3. System Glitch in Car Electronics:
You park your car at night, everything seems fine, but in the morning, the battery is dead. It could be because something is wrong with parts of your car, like the BCM or Engine Control Unit, which control electrical systems. These systems act like the car’s brain, and if they glitch or don’t shut down properly, they can slowly drain your battery without you knowing.
4. Extra Stuff You Installed in Your Car
Let’s say you leave a phone charger plugged in all the time, even when the car is off it could leave you with a dead battery by morning. Things that didn’t come with your car, like a custom sound system, dash cam, or extra lights, can also keep pulling power from your battery if they’re not wired properly.
5. Bad Fuses or Ground Wires
It happens when there’s an issue with the electrical connections in your car. Fuses protect your car’s electrical system from getting too much power. If the fuse is broken, it can stop parts of your car from getting power. Ground wires are the pathways that complete the electricity flow. If these wires get disconnected, your car’s electrical systems may not work properly, which can drain your battery.
“Did you know that a car battery typically lasts 3-5 years? However, about 25% of drivers experience battery failure before it reaches that age, often due to factors like electrical drain and extreme weather.”
Tips to Keep Your Battery Healthy
Use a Smart Battery Charger
A smart charger keeps your battery healthy by giving it exactly the power it needs. It automatically stops when the battery is full, so it doesn’t overcharge. It’s perfect if your car stays parked for a long time.
Get Your Electrical System Tested Annually
Once a year, have a mechanic check your battery and electrical system. This helps find small problems early before they leave you stuck with a dead battery.
Clean your terminals
Clean your battery terminals regularly to make sure the battery can send power properly. The most common way to clean them is by using a mixture of baking soda and water.
Protect the Battery with an Insulation Kit
You can use a battery insulation kit in very hot or cold weather to protect your battery. It helps the battery last longer and work better.
Double-Check Lights
Before leaving your car, always check that all the lights are off. This helps prevent the battery from draining overnight.
Conclusion
Taking care of your battery can save you from unexpected breakdowns. By understanding the common causes of battery drain and following these prevention tips, you can keep your battery healthy for longer. A little attention and regular checks will help keep your car running smoothly. Otherwise keep on thinking What Keeps Draining My Car Battery?
The most common problems with some of the sandblasters are that they usually have flow problems and want to know how to fix sandblaster flow problems?
Today we are going to help you out of it.
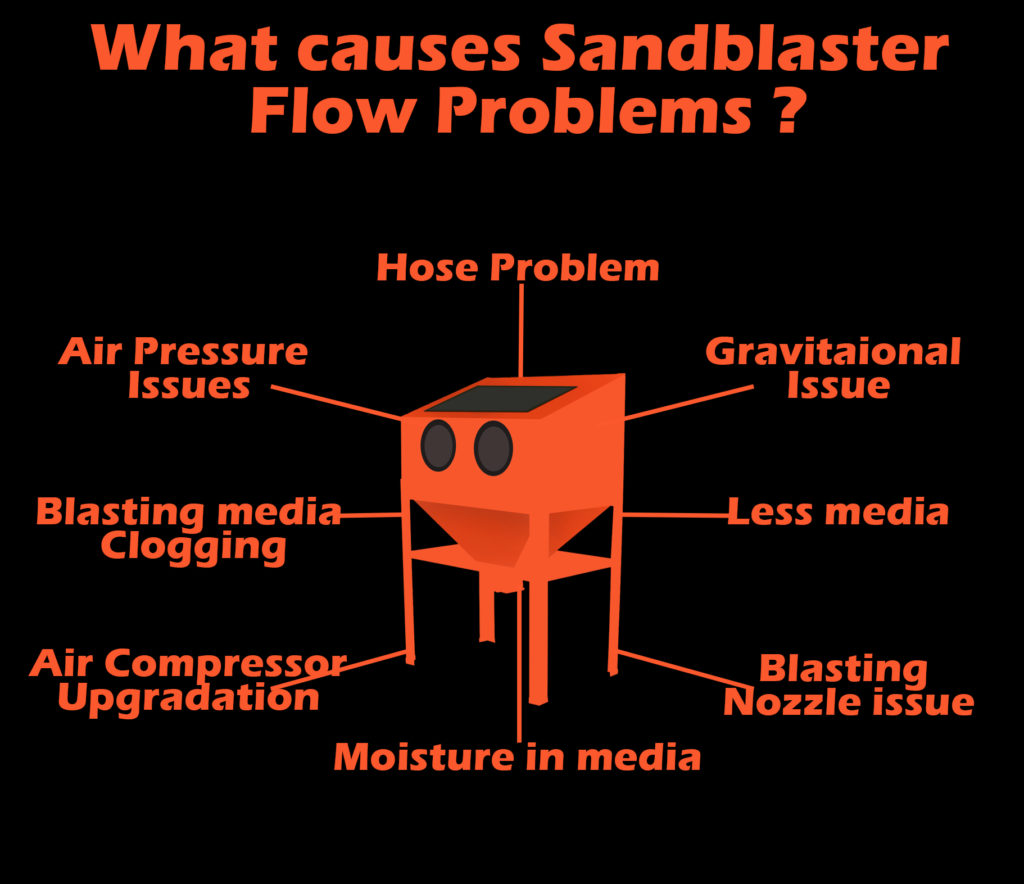
The most common type of sandblaster you usually see is Gravity / Siphon based and others are compressed air based. Now first of all we will show we will tell you what is the reason that these sandblasters have flow problems.
1) Air Pressure Issues :
The first reason that your Sandblaster flow is not proper can be due to air pressure, you may not be getting the proper air pressure required by your sandblaster.
1st check your air pressure gauge, Read your user manual and see if you are getting the desired air pressure required by your sandblaster. If still, the sandblaster is not giving the desired pressure then check maybe your air compressor has decided not to work anymore or your sandblaster has some problems.
By the way, if you are thinking to replace your sandblaster I have Reviewed best sandblaster for cars here.
2) Air Compressor Upgradation :
If you are using an Industrial Sandblaster then you might need a large air compressor and also need to have a large Air multistage drying system.
Now if you are thinking that what is that these sandblasters use water and air mixture to make this sandblasting effective, this system sends Air, Sand & water mixture with high pressure and it removes the paint or rust easily.
Now if you don’t have these types of sandblaster then you should check your sandblasters requirement as what kind of Air Compressor it requires. you can easily find the requirement on the user manual.
If you fulfill the requirement demanded by your sandblaster then you should check the compressor as it might be having some problem with it. The last option is only to upgrade it.
3) Blasting media Clogging
Media Clogging is the most common issue that we have seen in most of the sandblasters, the clogging we see is usually due to low pressure or not the proper use of the suitable media recommended by the manufacturer.
To see what kind of blasting media is recommended by your manufacturer you should see the user manual or the product on amazon you find information there.
Another thing you should see is the grit size supported by your sandblaster, for this, you can also see the manufacturer user manual or the product on Amazon or other online stores.
Another thing is that sometimes a when a blasting media is not coming out properly try to shake your sandblaster sometime this thing also works for some sandblaster.
4)Moisture in media
Another most common problem is moisture in media, due to moisture in your sandblasting sometime the sandblaster gets clogged and it would not work efficiently.
Moisture usually due to environmental factors or can be due to other factors but you dont need to worry we are not here to identify your problems only we are here to give you the solutions too.
so if you have for some reason got moisture in your media than there are 2 options you can go for if you have an Oven you can bake your sanding media in it for some time and it would remove all the moisture from your media and you would be ready to go with your sandblaster.
Now if you don’t have an oven no need to worry if you have plenty of time you can utilize heat from sun put your blasting sand in a big bucket or if you have an open area you can use it, spread the sand and let it sit in sun for a day hope so it would do the job
5) Gravitational Issue
The most common issue with the gravity/based sandblaster is that they usually have gravity issues now by gravity issues I mean is that these sandblaster are not compressed air based so they have to be fed by gravity.
some sandblaster have seen to been needing more gravity than Other and for that you had to keep them on top of something & being on ground level was not sufficient.
what I would suggest is if you have bought a sandblaster with this kind of issue you would need a long hose and it’s not going to be easy to move around and it would be a wise decision to upgrade it.
6) Less media
Another issue is that fewer media in the sandblaster can cause flow problems in the sandblaster. Now why this can cause a problem is because if you are reusing the media it would eventually get shaped into smaller particles and then it may not be as effective as it was before and its flow will also be disturbed.
and make sure before sandblasting that you should check how much of sandblasting media do you actually have inside of it if you see that the air is properly coming out but the media is not then either you need to adjust the flow from the nozzle or you need to add more media into it.
7) Blasting Nozzle issue
Blasting nozzles are the key component of any sandblaster these nozzles wear out with the passage and of time and use. because the blasting media passes through the nozzles at high speed which in result wears out the nozzles. When the nozzles wears out than the it would push more blasting media through it and would require more air pressure so it would be better to change your blasting nozzle.
Now if you are using a good brand sandblaster they usually provide more than 1 nozzle for your sandblasting gun so you don’t have to buy every time.
Some brands do provide ceramic or other material nozzles so if you have then you don’t need to buy one and simply replace it. It will solve your nozzle issues.
8) Hose problem
Another reason why your sandblaster is having flow problems can be due to problem with your hose. If you are facing such problem
make sure that your hose does not get bend while using it as it may restrict your sandblasting media flow. The Other thing is that you should check a leak in your hose because if there is a leak then the air pressure won’t be coming out as efficient as it can.
Don’t try to tape your leak as the air pressure is a much higher volume that the tape won’t be able to hold it for a longer period, the best option you can opt for is to replace your hose.
we hope so we have addressed all the issues mentioned above, but still if there is any issue that you think we have not covered you can let us know at our contact us page.
Let’s troubleshoot this together. Here’s the scoop:
Clogged nozzle? A blocked nozzle is the #1 culprit. Sand can clump or debris might be stuck. Try removing the nozzle and giving it a good rinse. Think of it like a straw clogged with a gummy bear—no airflow, no sand!
Air pressure issues? Sandblasters need serious air pressure. If your compressor’s PSI is too low, the sand won’t blast. Check your compressor’s gauge and adjust it to the blaster’s recommended PSI (usually 80–120 PSI). Pro tip: Always double-check your hose connections—leaks steal power!
Empty sand supply? Sounds obvious, but… is your hopper actually full? If it’s running on fumes, the blaster’s just blowing hot air. Refill it with the right grit (too fine, and it’ll clog; too coarse, and it’ll wear out your nozzle faster).
Valve malfunction? The valve that controls sand flow might be jammed or broken. Give it a gentle tap with a rubber mallet to dislodge any grit. If that doesn’t work, it might need cleaning or replacement.
Worn parts? Over time, seals, hoses, or the internal valve can degrade. Inspect for cracks, tears, or leaks. Replacement parts are usually affordable and easy to swap.
Air pressure fluctuations Your compressor might be struggling to keep up. If it’s too small or the tank is draining faster than it refills, pressure drops, causing the blaster to surge. Check:
Is your compressor rated for your blaster’s PSI/CFM needs? (Most need 80–120 PSI and 10+ CFM.)
Are there leaks in your air hose? (Listen for hissing or feel for vibrations.)
Is the regulator set correctly? (A loose knob can cause wobbly pressure.)
Clogged or inconsistent sand flow Wet, clumpy, or dirty sand is a surging villain. Here’s what to do:
Sift your sand through a screen to remove clumps.
Use dry, clean grit (moisture makes it stick!).
Check the hopper’s agitator—is it spinning? If it’s stuck, sand feeds unevenly.
Worn or dirty parts Over time, seals, valves, or nozzles wear out or get gunked up.
Inspect the nozzle for partial clogs (use a wire brush to clean).
Check the internal valve—worn seals here cause pressure leaks.
Replace O-rings or worn seals (they’re cheap and easy to swap).
Operator technique Sometimes, the issue is how you’re holding the trigger. A shaky grip or jerky movements can mimic surging. Try:
Are you ready to embark on the ultimate road trip adventure? Before hitting the open road, make sure your vehicle is road-trip ready and you’re equipped with all the necessary safety gear and accessories. Introducing the most comprehensive Ultimate Road Trip Checklist, carefully crafted to guarantee a stress-free and enjoyable journey for you and your fellow travelers.
Vehicle Inspection Made Easy
Our checklist begins with a thorough under the hood section, guiding you through essential vehicle inspections, including:
Engine oil level and quality checks
Coolant level inspections
Tire pressure verification and tread checks
Safety First: Essential Gear and Accessories
Don’t compromise on safety! Our Safety Essentials section ensures you’re prepared for any situation:
Emergency kit must-haves (first aid, fire extinguisher, and more)
Recommended gear for a safe and comfortable journey
Enhance Your Road Trip Experience
Take your adventure to the next level with our Recommended Gear section, featuring:
Portable power solutions (jump starters and power banks)
Navigation tools (GPS and phone mounts) for effortless route planning
Why Choose Our Ultimate Road Trip Checklist?
Comprehensive: Covers all aspects of road trip preparation
Printable: Easily print and check off items on the go
Expert-Curated: Ensures you don’t miss critical safety and vehicle inspection checks
Amazon Associate Links: Conveniently find and purchase recommended gear and accessories
Download, Print, and Hit the Road with Confidence!
Don’t let unexpected breakdowns or safety concerns ruin your road trip. Use our Ultimate Road Trip Checklist to:
Save time and money on potential repairs
Ensure a safe and enjoyable experience for all passengers
Create lifelong memories on your dream road trip adventure